


Ad: As an Amazon Associate I earn from qualifying purchases, and I also earn commission from other affiliate links, at no additional cost to you. Learn more.
Learn how to make crisp, buttery vegan tart shells with just 4 ingredients and no eggs or dairy. Perfect for jam tarts, mini banoffee pies, lemon tartlets and more – with a melt-in-the-mouth texture that you genuinely wouldn’t know was vegan.
These homemade vegan tart shells are light, crisp and buttery. With a melt-in-the-mouth texture and delicately sweet flavour, these vegan tartlet shells are perfect for making individual vegan desserts.
The pastry dough is easy to make, using a food processor for a quick and low-mess method. You’ll need just 4 simple ingredients and less than 20 minutes of active prep time to make these dairy free and egg free tart shells.
Have you ever made vegan pastry before? Whilst it can seem intimidating, making beautiful pastry that is delicate to eat is not as complicated as it may seem. I’m walking you through the process, providing crucial success tips for creating excellent vegan pastry, along with a selection of delicious filling ideas.
Happy baking, Tara x
Looking for recipes like this delivered to your inbox? Sign up for our newsletter here.
Updated: 9th September 2026


👋 Hi, I’m Tara!
I’m the recipe developer behind A Vegan Visit — usually found testing in the kitchen with flour on the floor and a tiny sous chef by my side. I’ve been creating vegan recipes for over 10 years. Read my full story here →
WHY YOU’LL LOVE THESE VEGAN TART SHELLS
Easy to make and minimal prep. I use a food processor to make this pastry in two simple steps: 1. Blend the flour, sugar and vegan butter to a breadcrumb consistency and 2. Add cold water and blend for a few seconds until the pastry comes together.
Crisp, light and melt-in-the-mouth. These vegan tartlet shells (a take on vegan pâte sablée) hold their shape and have a buttery, slightly sweet flavour that suits a multitude of dessert fillings. No soggy bottoms here!
Just 4 ingredients. Plain flour, icing sugar, ground almonds and vegan butter. No eggs, no dairy, no specialist ingredients.
Make ahead friendly. The pastry dough can be refrigerated for up to 2 days or frozen for up to a month, making it a brilliant recipe to batch make and have ready when you need it.
Endlessly versatile. Fill these tart shells with jam, lemon curd, chocolate ganache, caramel or fresh fruit; the possibilities are as wide as your imagination and they suit both simple weeknight desserts and elegant dinner party finales.

WHAT IS VEGAN TART SHELL PASTRY (AND HOW IS IT USED)?
These vegan tart shells are made using a version of pâte sablée which is a French sweet shortcrust pastry that is traditionally made with flour, butter, sugar, egg yolk and sometimes ground almonds. It’s known for its fine yet sturdy, melt-in-the-mouth texture which makes it the pastry of choice for individual tartlet shells and dessert tarts.
Our vegan version removes the egg yolk and uses vegan block butter in place of dairy butter. The result is a pastry that is beautifully crisp, delicately sweet and indistinguishable from the traditional version.
We’ve also included ground almonds in the recipe (a common addition to French-style sweet pastry) which adds a subtle nuttiness and helps achieve that desirable crisp, almost biscuit-like texture.

HOW TO MAKE THESE VEGAN TART SHELLS
Here’s a summary of the ingredients and steps involved in making this recipe. Make sure to head to the recipe card below for the full recipe, ingredient quantities and detailed instructions.
INGREDIENTS
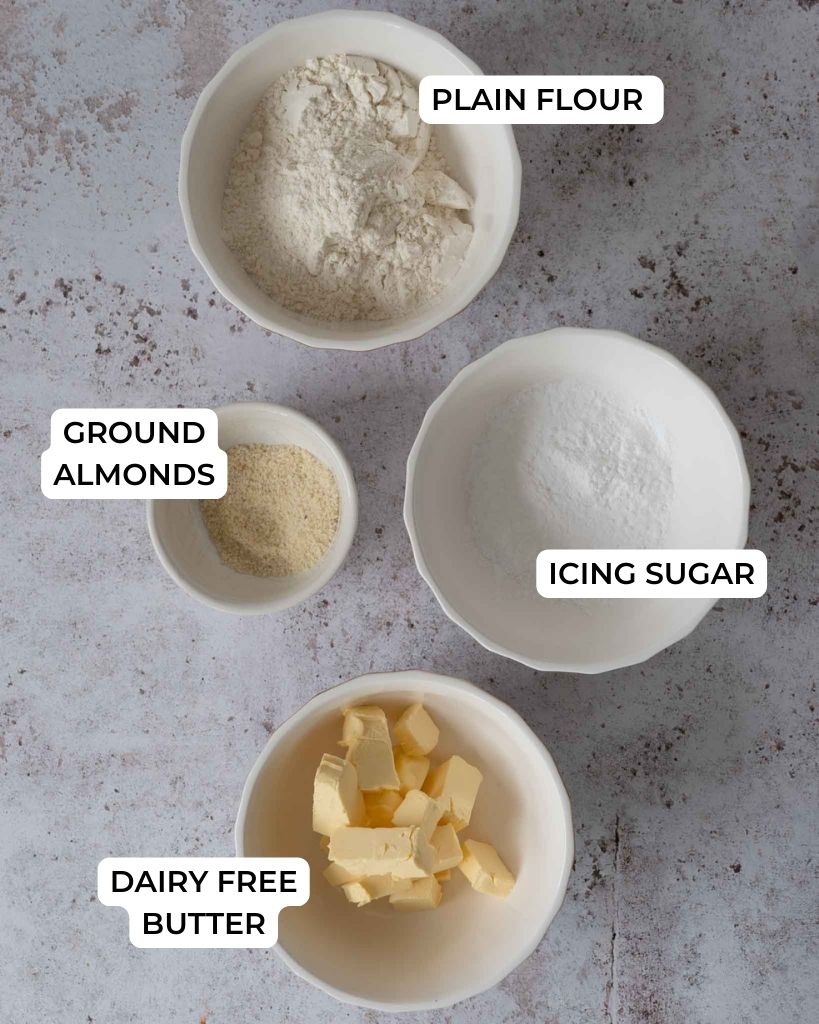
Here’s what you need to make this sweet tart crust:
Plain flour. Also called all purpose flour, or you can use pastry flour.
Icing sugar. Also called powdered sugar. You should not substitute for caster, granulated or brown sugar.
Ground almonds. Used to add a delicate crispness to the pastry.
Dairy-free butter. Use the block kind that you can cut into cubes rather than a spreadable variety. Make sure it’s cold when you use it.
Water. Make sure your water is as cold as possible!
EQUIPMENT
🧑🍳 Equipment You’ll Need
- Food Processor – the quickest and lowest-mess method for making pastry. You can make this recipe by hand too (see the FAQs below for how).
- Rolling Pin – for rolling the pastry to an even 3mm thickness.
- 10cm (4″) Fluted Mini Tart Tins – ideally with a removable base for easy removal once baked. This recipe makes 6.
STEP-BY-STEP INSTRUCTIONS
Make sure to head to the recipe card below for the full recipe and instructions on how to make this vegan tart crust!
STEP 1. Gather together your ingredients and weigh them out. We recommend using electronic scales rather than measuring cups.
STEP 2. Blend the ingredients. Add the ingredients to the bowl of food processor (except the water) and blitz until the mixture resembles breadcrumbs, with no visible chunks of butter remaining.

STEP 3. Add the water and blend again for a few seconds.
STEP 4. Bring the pastry dough together. The mixture should then come together when squeezed between your fingers, and no longer be crumbly. If it doesn’t, add a teaspoon of cold water and blitz again before testing once more.

STEP 5. Chill the pastry. Bring the mixture together into a ball and wrap the pastry dough ball in eco plastic wrap. Press it down to flatten it slightly into a disc (this makes it easier to roll out later). Chill the pastry in the refrigerator for at least 1 hour or in the freezer for 30 minutes.
Don’t skip this step – chilling the pastry is what prevents the butter from leaking out during baking, and helps the pastry to keep its shape.
Note 1: Don’t freeze the pastry for more than 30 minutes if you plan to use it today. You can transfer it from the freezer to the fridge after 30 minutes if you’re not quite ready to roll it out.
Note 2: The pastry can be stored in the fridge for up to 2 days (wrapped tightly in eco cling film and ideally in an airtight container too).
STEP 6. Roll out the pastry. Unwrap the chilled pastry and transfer it to a lightly floured surface. Roll the pastry out to around 3mm thick (1/4cm or 1/8”). Too thin and it will be prone to tearing, too thick and it may not cook through properly.

STEP 7. Line the tart tins. Cut out a piece of pastry dough that is 1-2cm larger than one of your tart tins. Transfer the pastry to the tart tin and gently press it into the base and up the sides.
Tip: If there are any small cracks or tears, just patch them up with the spare pastry.
STEP 8. Trim the pastry. Cut off any excess pastry with a sharp knife. You can re-roll any leftover pastry to line additional tart tins.

STEP 9. Chill again! Prick the base with the tip of a knife (or a fork). Place the tart shells on a baking tray and put them in the fridge to chill for 10 minutes whilst you preheat the oven.
STEP 10. Bake for 15-20 minutes at 150°C fan (170°C conventional / 325°F / gas mark 3) until the pastry is dry to the touch and lightly golden. Let the pastry cases cool to room temperature in the tins before removing them.
Note: Pastry is fragile when warm but firms up as it cools. Once completely cool, gently push up the removable base to release each tart shell.

TIPS FOR MAKING VEGAN TART SHELLS
Keep everything cold
The most important tip when making any shortcrust pastry! Use cold vegan butter and ice cold water when making pastry, and chill your pastry between steps. This will prevent the butter from leaking out and the pastry from collapsing during baking.
Don’t overwork the pastry
Handle the pastry as little as possible throughout the whole process. Overworking develops the gluten which makes the pastry tough and prone to shrinking in the oven. In the food processor, blitz just until the dough comes together (don’t keep going!). When rolling, use confident even strokes rather than lots of back-and-forth movement. The briefest knead before rolling is all you need.
Patch any cracks as you go
This pastry is forgiving so don’t panic if you get cracks or tears when lining the tins. Simply press a small piece of spare pastry over the crack and smooth it down with your fingertip. Once baked, you won’t be able to tell, especially if you plan to fill the tart shells. It’s much better to patch than to try to re-roll and re-line, which risks overworking the pastry.
Don’t skip the chill time
There are two chilling stages in this recipe: 1. after the dough comes together, and 2. after you’ve lined the tart tins. Both are important. The first chill relaxes the gluten and firms up the butter so the pastry holds its shape. The second chill means the pastry goes into a hot oven from cold, which gives you a better bake. Skip either and you risk shrinkage and a greasy result.
For an extra neat finish
Pastry can puff up a little in the oven, which isn’t too much of an issue if you plan to fill the tart shells. However, if you would prefer an extra neat finish, line the unbaked pastry cases with a sheet of parchment paper and fill them with dried beans or rice. Bake for 15 minutes before removing the parchment and dried beans/rice. Continue baking for 3-5 minutes or until the pastry is lightly golden and dry to the touch. The weight of the beans/rice will stop the pastry from puffing up too much.
Bake until lightly golden
Baking time can vary depending on the oven and the size of the tart pan. Bake for 15 minutes before checking the pastry; if it is dry and lightly golden it’s likely ready. If the pastry does not feel dry and/or is still pale, bake for another 2-3 minutes before checking again.
Did you underbake? Follow this tip!
If you take the pastry cases out of the oven and after a few minutes the base starts to look a little dark or damp then they’re probably underbaked. You want them to be dry to the touch and a light golden colour. Fear not though! If you think you’ve taken them out of the oven too soon, just preheat the oven again and pop them back in again for a few minutes so they can finish cooking.
Cool fully before removing the tins
Pastry is delicate when warm and will firm up considerably as it cools. Attempting to remove the tart shells from the tins while still warm is the most common cause of breakage. Be patient and give them at least 30 minutes at room temperature before pushing up the removable base to release them.
SERVING AND STORAGE
HOW TO SERVE
Vegan Jam Tarts. Fill with tangy raspberry jam and drizzle with dark chocolate for fruity, beautiful individual vegan tarts. A classic British teatime treat made completely plant-based.
Lemon Tartlets. Make an easy vegan lemon curd and set it in these vegan tartlet shells. Top with whipped coconut cream and curls of vegan white chocolate for an elegant dinner party dessert.
Mini Banoffee Pies. Line the tart shells with sliced banana, top with our easy vegan caramel sauce, a generous dollop of whipped vegan cream and a grating of dark chocolate. Ridiculously good!
Vegan Biscoff Tarts. Fill to the brim with Biscoff spread and marble with vegan white chocolate for a sophisticated but surprisingly easy individual dessert.
Mini French Chocolate Tarts. Create a vegan chocolate ganache (like in this recipe here) with dark and milk dairy free chocolate and dairy free cream, set it in the tart shells and top with fresh raspberries or a pinch of flaky sea salt.
HOW TO STORE
Baked, unfilled tart shells. Store in an airtight container at room temperature for up to 3 days, or freeze for up to 1 month. They’re best stored unfilled – add your chosen filling closer to serving.
Unbaked pastry dough. Wrap tightly in eco cling film and refrigerate for up to 2 days, or freeze for up to 1 month. Defrost fully in the fridge for 24 hours before rolling and baking.
VARIATIONS
With coconut oil for extra crispness. My Vegan Banoffee Pie and Vegan Sweet Shortcrust Pastry both use a blend of vegan butter and coconut oil for a slightly crisper finish – ideal for larger tarts where a firmer pastry gives better structure.
With desiccated coconut. My Tangy Lemon Cream Pies use a version that adds desiccated coconut to the pastry dough for a subtle tropical flavour twist that pairs beautifully with citrus fillings.
With almond extract. My Raspberry Jam Tarts add a small amount of almond extract to the dough for a delicately fragrant finish that complements the fruity jam filling.
Chocolate pastry. Replace 20g of the plain flour with 20g of cocoa powder for a chocolate-flavoured tart shell, which is perfect for chocolate ganache or salted caramel fillings.
Larger tarts. This recipe works equally well for larger tart tins. A 20cm loose-bottomed tart tin gives you one large dessert tart rather than six individual shells. Bake until lightly golden all over (around 15 minutes).
HOW WE TESTED THIS RECIPE
The fat. We tested this pastry with vegan block butter only and a blend of butter and coconut oil. Both options work well but a 100% butter version gave a slightly less crisp finish, which we felt was more versatile for a mini tart shell.
The sugar type. We tested icing sugar (powdered sugar) vs caster sugar vs granulated sugar. Icing sugar gave a finer, more delicate texture. Coarser sugars can give a slightly grittier result.
Ground almonds vs no ground almonds. We tested with and without. The version with ground almonds had a more complex, biscuity flavour and a slightly crisper texture. The difference was subtle but we felt it was worth the extra ingredient.
Chilling time. We tested various chill times for the dough. Skipping the chill time gave a greasy, collapsing pastry. 1 hour in the fridge (or 30 mins in the freezer) gave the most consistent results.
Baking temperature. We tested several temperatures and found that a slightly lower oven gave the most evenly cooked result – the pastry baked through gently without the edges catching before the base was done. Higher temperatures cooked the edges too quickly.
With and without blind baking weights. We tested both methods: pricking with a fork vs lining with parchment and baking beans. Pricking gave a slightly more rustic result with a little puffing, whereas baking beans gave a neater, flatter base. Both work. We use the fork method in the standard recipe for simplicity, with the baking bean method as an option for a particularly neat finish.

FAQs
Can vegans eat pie crust?
Traditional pie crust is typically not vegan because it contains dairy butter and egg. Pastry is also often glazed with egg yolk to give it a golden, shiny colour. It is possible to make vegan pie crust by substituting dairy butter for non-dairy butter and omitting the egg – the result is just as light, crisp and buttery!
What is a vegan substitute for butter in pie?
It depends on the type of pastry you are making as to the most appropriate substitute for butter in pie crusts. You can generally use vegan block butter, vegetable shortening or cold coconut oil instead of butter in pie crusts and tart shells.
We’ve got several vegan pastry recipes on the blog using different fats depending on the type of pastry:
- This recipe for Vegan Tart Shells – we use vegan block butter for a melt-in-the-mouth sweet pastry
- Vegan Sweet Shortcrust Pastry – a blend of vegan butter and coconut oil gives structure to this larger pastry case
- Vegan Hot Water Crust Pastry – spreadable margarine and vegetable shortening are combined to make a sturdy pastry for savoury pies
- Vegan Rough Puff Pastry – in our Vegan Cornish Pasty recipe we use vegetable shortening to make pastry with flaky layers
Why put fork holes in pie crust?
Using a fork or knife to prick the base of a pie crust before baking helps to prevent the pastry from rising too much and doming in the centre (which would leave less space for filling).
What is ‘blind baking’?
Blind baking means baking the pastry case before adding the filling. There are two methods. The first is to prick the base with a fork and bake without any filling. The second, for a neater finish, is to line the unbaked pastry with parchment paper, fill with dried baking beans or rice and bake for 15 minutes before removing the parchment and beans and baking for a further 3–5 minutes until golden.
Can I make tart shells without a food processor?
Yes! A food processor is the quickest and lowest-mess method, but you can absolutely make this pastry by hand.
- Add the flour, icing sugar, ground almonds and cold cubed butter to a large bowl and use your fingertips to rub the butter into the dry ingredients.
- Work quickly and lightly until the mixture resembles fine breadcrumbs (you want to avoid warming the butter with your hands, so the faster the better).
- Then add the ice cold water a little at a time and bring the pastry together with a knife or your hands until it forms a ball. Wrap and chill as per the recipe.
Why did my tart shells shrink?
Shrinking can be caused by a few things, including:
- overworking the pastry – this develops the gluten, causing it to contract in the oven
- insufficient chilling – chilling relaxes the gluten in the dough and firms up the butter, which helps the pastry to hold it’s shape
- not rolling the pastry large enough – let the pastry overhang the tin by 1-2cm before trimming it, so that it comes right up to the top of the tin. An alternative method is to bake the pastry case with the overhanging pastry and then trim off the overhang with a sharp knife once baked.
Blind baking the pastry case filled with baking beans can also help to support the sides and prevent the pastry from shrinking during baking.
Can I make these gluten free?
I haven’t tested a fully gluten free version of this specific recipe, so I cannot guarantee results. That said, a good quality gluten free plain flour blend (one that is designed as a 1:1 substitute for plain flour) is your best bet.
Be aware that gluten free pastry can be more crumbly and harder to work with than regular pastry, so handle it as little as possible and patch up any cracks as you go. Chilling the pastry thoroughly before and after lining the tins is especially important when working with gluten free flour.
Can I make this pastry in advance?
Yes! The uncooked pastry dough can be refrigerated for up to 2 days (wrapped tightly in eco cling film) or frozen for up to a month. Defrost the dough fully in the fridge for 24 hours before rolling and baking.
Baked unfilled/empty tart shells can be stored in an airtight container at room temperature for up to 3 days, or frozen for up to 1 month.
Can I use these tart shells for savoury fillings?
This pastry is sweet (it contains icing sugar) so it’s designed for dessert fillings. For savoury tarts and quiches, you’d want an unsweetened shortcrust pastry instead.

How to Make Vegan Tart Shells (Easy Pastry Recipe)
Ingredients
- 160 g plain flour (or pastry flour)
- 50 g icing sugar (or powdered sugar)
- 10 g ground almonds
- 100 g dairy free butter (the block kind, cut into cubes)
- 1 tbsp water (ice cold)
Equipment
Instructions
- Blitz the ingredients. Add all of the ingredients, except the water, into a food processor and blitz until the mixture resembles breadcrumbs. This should take approximately 20 seconds.160 g plain flour, 50 g icing sugar, 10 g ground almonds, 100 g dairy free butter
- Add the water. Add 1 tbsp cold water to the mixture and blitz again briefly for approximately 10 seconds. Take a small handful of the mixture and squeeze it together in your hand - if the mixture comes together into a ball then it’s ready, if it’s crumbling apart then add another tsp of water and blitz again before testing once more.1 tbsp water
- Chill the pastry. Remove the mixture from the food processor and bring it together into a ball. Press it down to flatten it slightly, wrap it tightly in eco cling film and either refrigerate it for 1 hour or freeze it for 30 minutes.Note: Chilling the pastry before baking prevents the butter from leaking out during baking.Note: Don't freeze the pastry for more than 30 minutes if you plan to use it today. You can transfer it from the freezer to the fridge after 30 minutes if you're not quite ready to roll it out.
- Prepare to roll out the pastry. Once the pastry has been chilled, transfer the dough to a lightly floured surface. Knead the dough briefly for a couple of seconds to make it easier to roll out.
- Roll out the dough. Lightly dust a rolling pin with flour and then roll the pastry dough out to around 3mm thick (1/4 cm or 1/8"). If you roll the pastry thinner than this then it is more likely to tear, if you roll the pastry thicker than this it may not cook through properly.
- Prepare the baking tins. Spray a light coating of spray oil onto non-stick tartlet tins (with removable bases) to prevent the pastry from sticking and to make it easier to remove the tart shells from the tins once baked.Note: We used six round 9cm (3.5”) tartlet tins with removable bases.
- Transfer the dough. Roughly cut out a piece of pastry dough that is 1-2cm larger than one of your tart tins. Transfer this piece of dough to the tart tin and gently press it down into the tin. Trim off any excess with a sharp knife.Note: If you have any mishaps along the way, don’t worry, this pastry is forgiving - just patch it up as necessary, using spare pastry to fill any holes. Use a small piece of rolled-up pastry to gently press the pastry into the tart tin.
- Repeat. Repeat this process with the remaining tart tins, re-rolling remaining pastry as necessary until it has all been used.
- Chill the pastry. Place all of the tart tins onto a baking tray and then lightly prick the base of the pastry cases with a fork . Place the tray into the fridge to chill for 10 minutes whilst you preheat the oven.
- Bake. Preheat the oven to 150°C fan (170°C conventional / 325°F / gas mark 3). Place the pastry cases into the oven to bake for around 15 minutes. Check the pastry cases - if the base feels dry to the touch and the pastry has started to pick up a bit of a golden colour then they are likely ready. If the pastry does not feel dry and is still pale, bake for another 2-3 minutes before checking again.Note: Baking time can vary depending on the oven and the size of the tart tins being used.Note: The pastry can puff up a little in the oven, which isn’t too much of an issue if you plan to fill the tart shells. However, if you would prefer an extra neat finish, line the unbaked pastry cases with parchment paper and fill them with dried beans or rice. Bake for 15 minutes before removing the parchment and dried beans/rice. Continue baking for 3-5 minutes or until the pastry is lightly golden and dry to the touch.
- Cool. Let the pastry cases cool to room temperature in the tins before removing them.
- Storing the pastry. If you’re not ready to bake your pastry just yet, you can wrap the dough up and either pop it in the fridge for up to 2 days, or freeze it for up to a month. Just defrost it fully in the fridge for 24 hours before use.
Notes
Nutrition
Loved these Vegan Tart Shells? Here are some more delicious vegan recipes to try:


DID YOU MAKE THIS RECIPE?
Tag @aveganvisit on Instagram so I can find you, I love seeing your recreations!
Instagram | Pinterest | Facebook | TikTok | Youtube
Please leave us a comment and star rating
We’d love to hear what you think of the recipe! Click the stars on the recipe card above, add a comment if you like and enter your email to verify you’re a human. Your email address will not be published. Thank you ♡
Would you like delicious vegan recipes, delivered to your inbox?
Tara
Hi, I’m Tara. I share comforting vegan recipes with a healthy twist – nourishing, approachable and designed for real life. I’m so pleased you’re here!